Moist & Fluffy Chocolate Cupcakes
Bake the perfect chocolate cupcakes with this easy recipe guide designed for moist texture, rich cocoa flavor, and Pinterest-friendly presentation. Includes step-by-step instructions, expert baking tips, and beautiful cupcake visuals from gourmetcookiebliss.com to inspire your next treat.
7/26/20257 min read

Moist & Fluffy Chocolate Cupcakes With Chocolate Butter Cream Frosting – Easy Recipe
Seriously, are you ready to change your life? Forget those dry, crumbly excuses for chocolate cupcakes you’ve suffered through. We’re talking Moist & Fluffy Chocolate Cupcakes that redefine dessert perfection, topped with a Chocolate Butter Cream Frosting so decadent you might just eat it with a spoon before it even sees a cupcake. I’ve been down this road—the quest for the ultimate chocolate cupcake—more times than I care to admit. I once tried a recipe that promised “moisture” and delivered something closer to a sad, dusty hockey puck. Never again. Today, friends, we conquer the chocolate realm together. Grab your apron, because we are making magic happen! ✨
Why This Recipe Reigns Supreme: The Quest for Ultimate Chocolate Depth
Everyone promises the best, right? But what actually makes a cupcake moist and fluffy? It’s not just luck; it’s a little bit of science we’re about to master. I’ve tinkered with this recipe for years, sacrificing perfectly good weekends to chocolate testing (tough life, I know 😉). This specific combination yields a crumb that stays tender for days, not hours.
Essential Baking Tools (Affiliate Picks from Amazon)
Below are the essential tools that streamline your baking process and elevate your results:
Digital Kitchen Scale - Accurate measuring for dense or quick-bread style recipes.
Hand Mixer - For combining ingredients, though often mixed by hand for a chunkier texture.
Silicone Spatula Set- Gently combining the batter to prevent over-mixing (key for muffins).
Dry Measuring Cups and Spoons - Measuring flour, oats, sugar, spices.
Liquid Measuring Cups - Measuring yogurt, milk, oil, or buttermilk.
Mixing Bowl Set - Combining ingredients separately before mixing.
Wire Cooling Racks - Cooling muffins so the bottoms don't get damp.
Oven Thermometer - Ensuring heat penetrates the thicker batter evenly.
Parchment Paper - Lining baking sheets.
Offset Spatula (Small) - Lightly leveling batter in the cups.
Whisk - Blending liquid ingredients or dry ingredients quickly.
Silicone Bowl Scraper - Scraping the last of the thick batter from the bowl.
Timer - Monitoring bake time, as muffins often take longer than cookies.
Sifter - Sifting dry ingredients for a lighter texture.
Cookie Scoop - Uniformly filling muffin cups.
Cupcake Pan (12-cup) - The essential pan for muffin shape.
Affiliate Disclaimer: As an Amazon Associate, I earn from qualifying purchases. These recommendations are based on tools I trust and love for baking.
The Secret Ingredients Hiding in Plain Sight
We use a few key players that separate the mediocre from the magnificent. You won't believe the difference these simple additions make.
Buttermilk: This is non-negotiable. The acidity in buttermilk reacts beautifully with the baking soda, giving you an incredible lift and tenderness. Ever wonder why bakery cupcakes taste so much better? Often, it's the buttermilk.
Hot Coffee or Boiling Water: Yes, you read that right! Adding hot liquid "blooms" the cocoa powder. This process releases maximum chocolate flavor, making your cupcakes taste intensely chocolatey instead of just… brown. Don't worry; you won't taste the coffee unless you use a ton of it—it just amplifies the cocoa.
Oil Over Butter (Mostly): While butter brings flavor, oil guarantees moisture. We use a blend here, but the oil keeps things soft even after refrigeration. Who even refrigerates cupcakes? Asking for a friend.
Mastering the Moist Chocolate Cupcake Batter
Let's get down to business. Baking should be fun, not a high-stakes chemistry exam. We keep the steps straightforward, ensuring even the most baking-averse among us can nail this. Remember, we are mixing things until they are just combined. Overmixing is the enemy of fluffiness; it develops too much gluten, and suddenly, your light, airy dream becomes a chewy mess. Do not overmix!
Prep Work: The Foundation of Success
First things first: gather your gear and ingredients. Mis en place, as the fancy chefs say, but really, it just means you won't be frantically searching for the baking powder when your batter is ready to go.
Preheat and Prepare: Get your oven humming at 350°F (175°C). Line your standard 12-cup muffin tin with paper liners. I always use high-quality liners because cheap ones sometimes stick like glue, and nobody needs that kind of relationship drama with a cupcake.
Dry Ingredients Dance: In a large bowl, whisk together your flour, sugar, cocoa powder, baking soda, baking powder, and salt. Whisking is crucial here; it’s like a mini-sifting session, breaking up any clumps.
Wet Ingredients Unite: In a separate bowl, mix your eggs, buttermilk, oil, and vanilla extract. This is where you combine the elements that will bring everything to life.
The Big Mix: Where the Magic Happens
Now for the assembly. We incorporate the wet into the dry gradually. Think gentle introductions, not a chaotic free-for-all.
Slowly pour the wet mixture into the dry ingredients. Mix on low speed—or by hand, if you trust your whisking arm—until almost combined. A few streaks of flour are okay at this stage.
Finally, carefully pour in your hot coffee or boiling water. Mix just until smooth. The batter will be thin; this is completely normal for an ultra-moist chocolate cupcake. If it looks thick, you’ve probably already gone too far! :’(
Baking Time: Patience, Young Baker
Fill your cupcake liners about two-thirds full. Seriously, resist the urge to overfill them unless you enjoy cleaning up slightly domed, over-enthusiastic cake tops. Bake for about 18–22 minutes. How do you check? Stick a toothpick in the center; if it comes out with just a few moist crumbs clinging to it, you’re golden. Pull them out and let them cool in the pan for about five minutes before transferring them to a wire rack to cool completely. Frosting a warm cupcake is a culinary crime, IMO.
Whipping Up the Dreamiest Chocolate Butter Cream Frosting
Okay, the cupcakes are cooling (the hardest part, I know). Now for the main event: the topping. I prefer a classic American buttercream but dial the chocolate up to eleven. This frosting is creamy, pipeable, and intensely chocolatey, not that waxy stuff you sometimes find.
Frosting Ingredients & Setup
Make sure your butter is perfectly softened. I mean soft, but not melted. If it’s too warm, your frosting will be soupy, and you’ll end up wearing most of it.
Butter First: Beat the softened butter until it’s light and fluffy. This takes a few minutes, so be patient. You are whipping air into the butter, which creates that lovely, stable structure.
Cocoa Power: Sift in your cocoa powder and a pinch of salt. Mixing this in now prevents a dusty, uneven frosting later. Mix until just incorporated.
Sweet Finish: Gradually add your powdered sugar, alternating with splashes of heavy cream or milk. Start slow; powdered sugar loves to explode out of the bowl. Add a splash of vanilla extract for depth.
Perfecting the Texture
If your Chocolate Butter Cream Frosting seems too stiff, add cream, one teaspoon at a time. If it’s too soft (hello, too-warm kitchen!), add a tablespoon or two of powdered sugar. A stand mixer makes this part ridiculously easy, but a strong hand mixer works just fine. Whip it for a solid 3–5 minutes on medium-high once it comes together; this final whipping incorporates the most air, making it incredibly light and fluffy. Do you want that perfect swirl? This is how you get it. 🍦
Troubleshooting Common Cupcake Catastrophes
Even with the best recipe, things can go sideways. Don't panic! I’ve been there. We learn from our mistakes, right? Or at least, we eat the evidence and try again tomorrow.
My Cupcakes Sank! This usually means one of two things: your oven temperature was too low, or you opened the door too often while they were baking. That sudden drop in temperature makes them say, “Welp, time to deflate.”
Frosting is Grainy: You didn't mix the powdered sugar in long enough, or the sugar lumps weren't fully dissolved. If you skip sifting, you risk this outcome. FYI, no one likes a gritty frosting experience.
They Stick to the Liner: You used old or low-quality liners, or you didn't let the cupcakes cool sufficiently before peeling them out. Always ensure the cupcakes are fully cooled before attempting to frost or remove them cleanly.
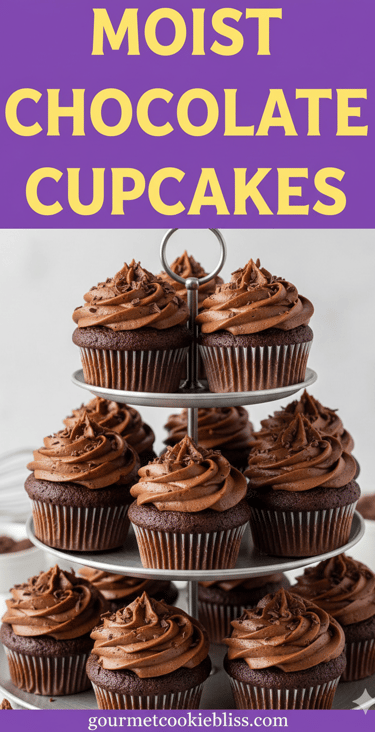
Final Touches: Presentation Matters (A Little)
Once your Moist & Fluffy Chocolate Cupcakes are cool, and your Chocolate Butter Cream Frosting is perfectly piped, you’re done! A little sprinkle of chocolate shavings or a tiny dusting of cocoa powder elevates the look instantly. You just made something truly spectacular, and you did it without any fancy equipment or impossible techniques. How cool is that?
Honestly, these cupcakes are perfect for any occasion—birthdays, Tuesday afternoons, or just because you deserve a moment of pure, unadulterated chocolate bliss. Go ahead, make a batch. You won't regret it. Tag me when you do! Happy baking! 😊
Affiliate Disclosure: Hey, just a quick heads-up! Some of the links I might occasionally use for specific baking tools or ingredients in the future could be affiliate links. That just means if you click and buy something, I might earn a small commission at no extra cost to you. I only recommend things I genuinely love and use myself, promise!
The Ultimate Moist & Fluffy Chocolate Cupcake Recipe
Yields: 12 Cupcakes
Prep time: 20 minutes
Bake time: 20 minutes
For the Moist Chocolate Cupcakes
1 ¾ cups all-purpose flour
¾ cup unsweetened cocoa powder (Dutch-processed preferred for deep color)
1 ¾ cups granulated sugar
1 ½ teaspoons baking soda
¾ teaspoon baking powder
1 teaspoon salt
2 large eggs
¾ cup buttermilk
½ cup vegetable oil
1 teaspoon vanilla extract
¾ cup hot strong brewed coffee (or boiling water)
Instructions:
Preheat oven to 350°F (175°C). Line a 12-cup muffin tin with paper liners.
In a large bowl, whisk together flour, cocoa powder, sugar, baking soda, baking powder, and salt.
In a separate medium bowl, whisk eggs, buttermilk, oil, and vanilla extract.
Pour the wet mixture into the dry mixture and mix on low speed until just combined.
Carefully pour the hot coffee/water into the batter and mix on low until smooth. The batter will be very thin.
Divide batter evenly among the 12 liners, filling them about two-thirds full.
Bake for 18–22 minutes, or until a toothpick inserted comes out with moist crumbs.
Cool in the pan for 5 minutes, then transfer to a wire rack to cool completely.
For the Fluffy Chocolate Butter Cream Frosting
1 cup (2 sticks) unsalted butter, softened (but still cool)
3 ½ cups powdered sugar, sifted
¾ cup unsweetened cocoa powder, sifted
½ teaspoon salt
1 teaspoon vanilla extract
3–5 tablespoons heavy cream or milk
Instructions:
In a large bowl or stand mixer, beat the softened butter on medium speed until light and fluffy (about 3 minutes).
Add the sifted cocoa powder and salt. Mix on low until just combined.
Gradually add the powdered sugar, alternating with 1 tablespoon of cream, mixing on low speed until incorporated.
Once all sugar is added, beat in the vanilla extract.
Increase speed to medium-high and beat for a final 3–5 minutes until the Chocolate Butter Cream Frosting is light, fluffy, and pipeable. Add more cream if it’s too stiff, or a tablespoon of powdered sugar if it’s too soft.
Frost cooled cupcakes as desired!
BEST Gourmet Cookie Recipes
Contact:
bestgourmetcokies@gmail.com
Best Gourmet Cookie Recipes © 2025. All rights reserved.