Raspberry Lemon Bars
Here are 5 sentences for a Google-optimized blog post description based on the article: Discover the ultimate Raspberry Lemon Bar recipe for perfectly moist and chewy bars bursting with tangy lemon and sweet raspberries. This easy-to-follow guide ensures a crisp shortbread crust and a vibrant, set lemon filling every time. Learn the secrets to achieving that perfect balance of tart and sweet, with plenty of fresh raspberry goodness. Elevate your baking with these irresistible homemade raspberry lemon bars that are sure to impress. Get ready to bake the best raspberry lemon bars you've ever tasted!
10/14/20256 min read

Raspberry Lemon Bars: Your New Obsession (Seriously)
Let’s be real: Are you tired of desserts that promise sunshine but deliver… well, mediocrity? 😩 Me too. I’ve spent years chasing that perfect bite—the one where tangy lemon cuts through buttery crust, and a burst of bright raspberry makes you momentarily forget your mounting to-do list. Friends, I finally nailed it. We are talking about Raspberry Lemon Bars that actually taste like summer exploded in your mouth, not like something you found in the back of a dusty bake sale box. Forget everything you thought you knew about baking these beauties; I’m about to spill all the tea on how you can whip up a batch that will make your neighbors think you hired a professional pastry chef. Ready to elevate your dessert game? Let’s get into it!
The Quest for the Perfect Crust: Foundation is Everything
Seriously, a bad crust ruins everything. It’s like wearing socks with sandals—just no. The crust for these bars needs to be shortbread perfection: crumbly enough to melt away but sturdy enough to hold that glorious filling.
🛠️ Must-Have Baking Tools (Affiliate Picks)
These tools make prep smoother and results more consistent. All are available on Amazon:
USA Pan 10x7-Inch Baking Pan – Nonstick, warp-resistant, perfect for brownies
Cuisinart Mini Prep Plus Food Processor – Ideal for blending sweet potato and dates into silky batter
OXO Good Grips Silicone Spatula – Flexible and heat-resistant for smooth spreading
Nordic Ware Cooling Rack – Helps brownies firm up evenly after baking
KitchenAid Digital Oven Thermometer – Ensures perfect baking temps every time
Butter: The Unsung Hero
You cannot skimp on the butter here. I learned this the hard way when I tried substituting margarine once. Never again. That batch tasted like sadness and regret.
Use real, unsalted butter. Cold butter is your best friend for that tender, sandy texture.
Don't overmix. Seriously, just pulse it until it looks like coarse sand. Overworking the gluten development is how you get a crust that tastes like a cracker. Who wants that?
Achieving That Golden Hue
We want golden, not pale and anemic, right? A little extra time in the oven for the crust before you pour in the filling makes all the difference. Think of it as par-baking to structural integrity. I usually bake mine for about 15 minutes until the edges just start kissing brown. FYI: This step prevents a soggy bottom, which, let’s face it, is a baking tragedy.
Conquering the Lemon Filling: Pucker Up!
This is where things get serious. We’re aiming for that beautiful, set custard that quivers just right when you gently shake the pan. Getting the right balance of tartness and sweetness is key; too much of one ruins the entire experience.
The Ratio That Never Fails
I’ve experimented with countless ratios of sugar to lemon juice. Too much sugar, and you get a sweet, eggy mess. Too much juice, and you get lemon soup. Ever wondered why some recipes fail spectacularly? It’s the numbers!
Here’s what I stick to now, and trust me, it’s magic:
Plenty of fresh lemon zest. This holds the most potent lemon oils, so don’t skip grating that bright yellow skin!
Freshly squeezed lemon juice only. Bottled stuff tastes like disappointment. IMO, this is non-negotiable for true flavor.
Eggs are the binder. They set the filling beautifully, transforming that liquid into firm, sliceable goodness.
Whipping in the Sweetness
You gently whisk the sugar, eggs, and juice together. Some folks like to warm it slightly, but I find just whisking vigorously works fine, as long as you don't create a mountain of foam. Too much air incorporation leads to weird bubbles in your final bar—nobody wants a bubbly lemon landscape, right? We want smooth perfection.
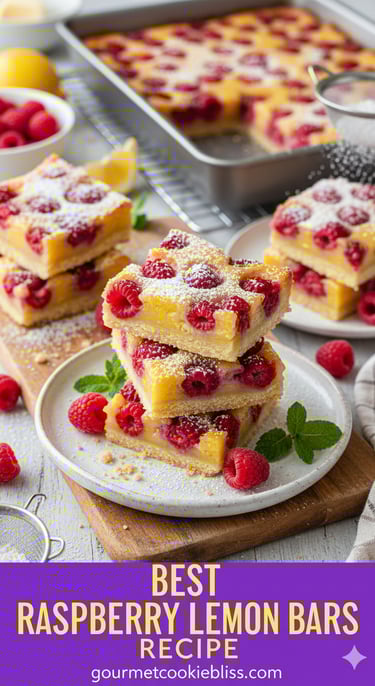
The Raspberry Game-Changer: Color and Pop!
So, a standard lemon bar is great, but a Raspberry Lemon Bar? Now we're talking! The raspberries aren't just there for decoration; they inject a necessary layer of complexity.
Fresh vs. Frozen: The Great Debate
Which one should you use? Honestly, either works, but you need to treat them differently.
Fresh Raspberries: If you use these, gently fold them into the wet filling right before pouring it over the crust. They stay prettier.
Frozen Raspberries: If you use frozen (which I often do in winter because, hello, availability), toss them with a tiny bit of flour first. This stops them from sinking straight to the bottom like little red anchors. I learned this after finding a concentrated layer of fruit sludge at the base of one batch. Blech!
The slight acidity of the raspberry perfectly complements the bright lemon. It’s a flavor party, and everyone’s invited! Have you ever tried adding other berries? I hear good things about blackberries, but I always come back to the raspberry classic.
The Bake and The Chill: Patience is a Virtue (Ugh)
This is where baking turns into a test of willpower. You pour that beautiful filling over the pre-baked crust, sprinkle your berries, and slide it into the oven. How long do you bake it? Until the edges look set and the center has only a slight jiggle left. Don't overbake it! Overbaked lemon bars are dry, and that’s a crime against dessert.
Cooling Down: The Hardest Part
Okay, this is the part that makes me want to scream into a pillow. You absolutely, positively must let these bars cool completely before cutting. And by completely, I mean chill them in the refrigerator for at least four hours, or better yet, overnight.
Why the intense waiting period? Because if you try to slice them warm, the custard filling turns back into a runny mess. You end up with lemon-raspberry soup on a crust shard. Not good for presentation, not good for taste. Patience yields perfect squares.
When you finally cut them, use a hot, sharp knife, wiping the blade clean between each slice. This gives you those pristine, Instagram-worthy edges we all secretly crave. You’ll thank me later when you see those clean lines! :)
Finishing Touches: The Powdered Sugar Blanket
A simple dusting of confectioners’ sugar is all these bars need for that final flourish. It adds a touch of sweetness to balance the tartness and gives them that iconic, snowy look.
Pro Tip: Dust them just before serving. If you dust them too early, the moisture from the filling will absorb the sugar, leaving you with a sticky, slightly translucent glaze instead of a beautiful matte white finish. Who wants sticky bars when you can have fluffy ones?
Why These Raspberry Lemon Bars Rule the Roost
So, why should you make this version? Because it hits all the right notes, my friend. It’s a perfect symphony of textures and tastes.
The Crust: Buttery, crisp, and structurally sound.
The Filling: Tart, sweet, and perfectly custardy set.
The Fruit: Bright, slightly acidic pops of raspberry flavor.
We managed to craft something that is simultaneously bright enough for a summer picnic yet rich enough for a cozy winter evening. That versatility is unbeatable! This recipe gives you that authentic, homemade flavor without needing a culinary degree. They are bright, they are bold, and they are utterly irresistible.
I hope you give these a try soon! Let me know in the comments what you think—did your crust stay crisp? Did you sneak a taste before they chilled? I won't judge, promise! Happy baking! 🍋🍓
Affiliate Disclosure: Heads up! As an enthusiastic baker, I sometimes link to my favorite tools or ingredients. If you click on one of those links and make a purchase, I might earn a small commission at absolutely no extra cost to you. I only recommend things I genuinely use and love, like that fantastic microplane zester I swear by.
Raspberry Lemon Bars Recipe Card 🧑🍳
Prep time: 20 minutes | Bake time: 35-40 minutes | Chill time: 4+ hours | Yields: About 16 bars
Ingredients
For the Crust:
1 cup all-purpose flour
½ cup confectioners' sugar
¼ teaspoon salt
½ cup (1 stick) cold, unsalted butter, cut into small cubes
For the Lemon Filling:
4 large eggs
1 ½ cups granulated sugar
⅓ cup all-purpose flour
½ cup fresh lemon juice (about 3-4 lemons)
1 tablespoon fresh lemon zest
Pinch of salt
For the Raspberries & Topping:
1 cup fresh or frozen raspberries (if frozen, see note above)
Confectioners' sugar, for dusting
Instructions
Preheat and Prep: Preheat your oven to 350°F (175°C). Line an 8x8 inch baking pan with parchment paper, leaving an overhang on two sides for easy removal later.
Make the Crust: In a medium bowl, whisk together the flour, confectioners' sugar, and salt. Cut in the cold butter using a pastry blender or your fingertips until the mixture resembles coarse crumbs. Press the mixture evenly into the bottom of the prepared pan.
Par-Bake: Bake the crust for 15 minutes until lightly golden.
Prepare Filling: While the crust bakes, whisk together the eggs, granulated sugar, flour, lemon juice, lemon zest, and salt in a separate bowl until just combined and smooth. Don't over-whisk!
Assemble and Bake: Carefully pour the lemon filling over the hot, par-baked crust. Gently scatter the raspberries evenly over the top of the filling.
Final Bake: Return the pan to the oven and bake for another 20–25 minutes. The edges should look set, and the center should have a slight jiggle.
Cool Completely: Remove from the oven and let cool completely on a wire rack. Once cooled to room temperature, transfer the pan to the refrigerator and chill for at least 4 hours, or preferably overnight.
Serve: Lift the bars out using the parchment overhang. Dust generously with confectioners' sugar just before slicing into squares. Enjoy the sunshine! ☀️
BEST Gourmet Cookie Recipes
Contact:
bestgourmetcokies@gmail.com
Best Gourmet Cookie Recipes © 2025. All rights reserved.